Installation, Uninstallation and File-Path Management in Jupyter Notebook
Beginner-Friendly Notes, Worked Examples and Practice Questions for B.Pharm Students
| Learning sequence Understand -> Choose -> Install -> Import -> Use -> Verify -> Save |
| Educational note: All medicine, laboratory and quality-control values are simulated only for programming practice. They are not clinical instructions or official product specifications. |
Learning Outcomes
- Define module, package, library, standard library, third-party package and dependency.
- Differentiate between standard-library modules and third-party libraries.
- Select an appropriate library for a basic pharmacy-data task.
- Install, update, inspect and uninstall packages from a Jupyter Notebook.
- Explain why %pip is safer than !pip inside a notebook.
- Check the Python interpreter, installed-package location and package version.
- Find and change the kernel working directory.
- Create project, data and output folders with pathlib.
- Save CSV, Excel and chart files to an explicit project folder.
- Recognize common installation, import and path errors.
1. Key Definitions
| Term | Simple definition |
| Module | A single Python file containing reusable variables, functions or classes. Example: the standard-library module math. |
| Package | A collection of related Python modules arranged in folders. A package can contain subpackages. |
| Library | A broad collection of reusable code for a purpose. In everyday teaching, library and package are often used informally as similar words. |
| Standard library | Modules and packages distributed with Python. They normally require import, but not a separate pip installation. |
| Third-party library | Reusable code developed outside the Python core project. It is installed separately, commonly from PyPI with pip or from conda channels. |
| Dependency | Another package required by a package. For example, pandas depends on NumPy. |
| Distribution package | The name installed by pip or conda. It may differ from the import name; scikit-learn is installed but sklearn is imported. |
| Import | The instruction that loads a module or package into the current Python program or Jupyter kernel. |
| Kernel | The Python process that executes notebook code and keeps variables and imports in memory. |
1.1 The Most Important Difference
| Point | Standard library | Third-party library |
| Source | Supplied with Python | Developed and distributed separately |
| Installation | Normally no separate installation | Install using pip or conda |
| Use | Import and call its functions | Install once, then import and use |
| Examples | math, statistics, datetime, pathlib | NumPy, pandas, Matplotlib, SciPy |
| Updates | Usually follow the Python installation | Can be updated independently |
| Package index | Documented in Python docs | Often published on PyPI or conda channels |
Remember: import math is correct. %pip install math is unnecessary and normally wrong because math belongs to the Python standard library.
1.2 Installation Name Can Differ from Import Name
| Install command name | Import statement | Meaning |
| scikit-learn | import sklearn | Machine-learning tools |
| opencv-python | import cv2 | Computer-vision tools |
| Pillow | from PIL import Image | Image-processing tools |
| beautifulsoup4 | from bs4 import BeautifulSoup | HTML parsing tools |
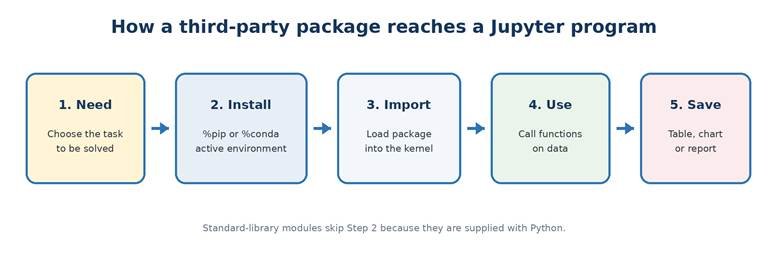
Figure 1. Standard-library modules skip installation; third-party packages do not.
2. Python Standard Library
Python’s standard library provides reusable solutions for many everyday programming tasks, including mathematics, dates, files, folders, text processing, data formats and databases. These modules are available with a normal Python installation, although some may depend on the operating system.
2.1 Why We Use Standard-Library Modules
- They save time because common functions are already written and tested.
- They avoid unnecessary package installation for simple tasks.
- They make programs shorter, clearer and easier to maintain.
- They are documented on the official Python website.
2.2 Useful Standard-Library Modules for B.Pharm Exercises
| Module | Main purpose | Simple pharmacy/laboratory use |
| math | Mathematical functions and constants | Round the required number of boxes upward with math.ceil |
| statistics | Mean, median, mode and spread | Summarize simulated tablet weights |
| datetime | Dates, times and time differences | Calculate days between two educational dates |
| random | Pseudo-random simulation | Generate reproducible simulated observations |
| pathlib | Modern file and folder paths | Create data, output and chart folders |
| os | Operating-system and directory operations | Check or change the working directory |
| csv | Read and write comma-separated files | Store a small batch table |
| json | Read and write structured JSON data | Save settings or a simple product record |
| re | Pattern matching with regular expressions | Check a simulated batch-code format |
| decimal | Controlled decimal arithmetic | Demonstrate exact decimal calculations |
| sqlite3 | Small local relational database | Store classroom inventory records |
| logging | Record program events | Create a learning audit trail for a script |
2.3 Common Import Styles
Import patterns
# Import the complete module
import math
print(math.ceil(12.2))
# Import one required function
from statistics import mean
print(mean([10, 12, 14]))
# Import a third-party package using a standard alias
import pandas as pd
Good practice: Import only what the program needs, place imports near the beginning of the notebook, and use familiar aliases such as np for NumPy, pd for pandas and plt for matplotlib.pyplot.
3. Third-Party Libraries
A third-party library is not part of Python’s core distribution. It must be installed in the environment used by the Jupyter kernel before it can be imported. Python’s official package index is PyPI, while conda can obtain packages from configured conda channels.
3.1 Why and Where They Are Used
- Large numerical calculations: arrays, matrices and vectorized operations.
- Data analysis: read, clean, filter, group and summarize tables.
- Visualization: create line charts, bar charts, histograms and box plots.
- Statistics: distributions, tests, regression and model diagnostics.
- Machine learning: preprocessing, training, prediction and evaluation.
- File exchange: read or write Excel workbooks and other specialist formats.
3.2 Important Libraries for the B.Pharm Python Course
| Install name | Import | Used for | Example educational use |
| numpy | import numpy as np | Fast numerical arrays and calculations | Simulated measurement arrays |
| pandas | import pandas as pd | Tables, CSV/Excel and data cleaning | Batch-wise data table |
| matplotlib | import matplotlib.pyplot as plt | Static and interactive plots | Trend or comparison chart |
| seaborn | import seaborn as sns | High-level statistical graphics | Distribution plot |
| scipy | from scipy import stats | Scientific and statistical functions | Descriptive statistics |
| statsmodels | import statsmodels.api as sm | Statistical models and diagnostics | Educational regression |
| scikit-learn | import sklearn | Machine learning workflows | Training/testing demonstration |
| openpyxl | import openpyxl | Read and write modern Excel files | Export a classroom workbook |
| jupyterlab | No normal import | JupyterLab application | Interactive notebooks |
| ipykernel | No normal import | Connect a Python environment to Jupyter | Select a project kernel |
3.3 Which Library Should I Choose?
| If the task is… | Start with… | Reason |
| Simple mathematics | math | Already in the standard library |
| Mean of a short Python list | statistics | Simple and no installation |
| Many numerical values | NumPy | Efficient array calculations |
| Rows and columns | pandas | DataFrame behaves like a data table |
| Basic chart | Matplotlib | Flexible plotting foundation |
| Statistical distribution plot | Seaborn | High-level statistical graphics |
| Statistical function or test | SciPy | Large collection in scipy.stats |
| Regression with detailed output | statsmodels | Statistical model summaries |
| Prediction or classification | scikit-learn | Consistent machine-learning workflow |
| Create an .xlsx file | openpyxl or pandas | Workbook control or table export |
4. Installing, Updating and Uninstalling Libraries
Best beginner choice in Jupyter: Use %pip rather than !pip. IPython’s %pip magic runs pip in the current kernel environment, reducing the chance of installing into a different Python environment.
4.1 One-Time Course Package Installation
Recommended pip command in Jupyter Notebook
# Run in ONE Jupyter code cell.
# Install only the package set needed for this course.
%pip install numpy pandas matplotlib seaborn scipy statsmodels scikit-learn openpyxl
Conda alternative inside Jupyter Notebook
# If the active Jupyter kernel is a conda environment,
# this is the equivalent conda-based course installation.
%conda install numpy pandas matplotlib seaborn scipy statsmodels scikit-learn openpyxl -y
Do not run both: Choose one main package manager for an environment. For an Anaconda environment, prefer conda for packages available there; use pip only when needed. Restart the kernel after installation if an import still fails.
4.2 Important pip Commands in Jupyter
| Purpose | Jupyter command | Meaning |
| Install | %pip install pandas | Install the latest compatible pandas |
| Install several | %pip install numpy pandas matplotlib | Install a selected group |
| Upgrade | %pip install –upgrade pandas | Update pandas |
| Specific version | %pip install pandas==3.0.5 | Install an exact version when required |
| Minimum version | %pip install ‘pandas>=3.0’ | Require at least a stated version |
| Uninstall | %pip uninstall -y pandas | Remove pandas without a confirmation prompt |
| List | %pip list | Show installed distributions and versions |
| Details | %pip show pandas | Show version, location and dependencies |
| Outdated | %pip list –outdated | Show packages with newer releases |
| Dependency health | %pip check | Report broken or incompatible requirements |
| Record environment | %pip freeze | Print exact installed versions |
| Export versions | !{sys.executable} -m pip freeze > requirements.txt | Save exact versions in the working directory; import sys first |
| Install from file | %pip install -r requirements.txt | Recreate packages listed in a file |
Create requirements.txt in Jupyter Notebook
# Save the active kernel’s exact package versions to a file.
import sys
from pathlib import Path
!{sys.executable} -m pip freeze > requirements.txt
print(“Saved package list:”, (Path.cwd() / “requirements.txt”).resolve())
4.3 Important conda Commands
| Purpose | Jupyter or Anaconda Prompt command | Meaning |
| Install | %conda install pandas -y | Install into the active conda environment |
| Update | %conda update pandas -y | Update one package |
| Remove | %conda remove pandas -y | Remove one package |
| List packages | %conda list | Show packages in the active environment |
| List environments | conda env list | Show all conda environments; use in Anaconda Prompt |
| Create environment | conda create -n bpharm_python python jupyterlab notebook ipykernel -y | Create an isolated teaching environment |
| Activate | conda activate bpharm_python | Switch to the teaching environment |
| Deactivate | conda deactivate | Leave the current conda environment |
4.4 Safe Uninstallation Procedure
- Confirm the active kernel and environment before removing anything.
- Check the package with %pip show package_name or %conda list.
- Remove only the intended package with %pip uninstall package_name or %conda remove package_name.
- Restart the Jupyter kernel.
- Run %pip check or re-import important packages to detect a broken dependency.
Caution: Avoid casually uninstalling packages from Anaconda’s base environment. A separate project environment is easier to repair and prevents one class project from disturbing another.
4.5 Optional: Create a Dedicated B.Pharm Environment
Anaconda Prompt commands
# Run these commands in Anaconda Prompt, not inside a normal Python cell.
conda create -n bpharm_python python jupyterlab notebook ipykernel -y
conda activate bpharm_python
conda install numpy pandas matplotlib seaborn scipy statsmodels scikit-learn openpyxl -y
python -m ipykernel install –user –name bpharm_python –display-name “Python (BPharm)”
jupyter notebook
After Jupyter opens, select the kernel named Python (BPharm). Each environment has its own Python interpreter and installed third-party packages, while sharing Python’s standard library with its base installation.
5. Important Commands in Jupyter Notebook
Commands beginning with % are IPython line magics. Commands beginning with ! run a system shell command. Python statements such as Path.cwd() run normally in the kernel.
5.1 Package and Environment Commands
| Command | Use |
| %pip install package | Install a package into the current kernel environment |
| %pip uninstall package | Remove a package |
| %pip show package | Show version, dependencies and installation location |
| %pip list | List installed packages |
| %pip check | Check dependency consistency |
| %conda install package | Install with conda in a conda kernel |
| %conda list | List packages in a conda environment |
| import sys; print(sys.executable) | Show the Python interpreter used by the kernel |
| import sys; print(*sys.path, sep=’\n’) | Show locations searched during import |
| import package; print(package.__file__) | Show the imported package’s source location |
5.2 Working, Navigation and Help Commands
| Command | Use |
| %pwd | Print the kernel working directory |
| %cd path | Change the kernel working directory |
| %ls | List files and folders in the working directory |
| %mkdir folder_name | Create a folder from the shell; pathlib is more portable in Python code |
| %who | List interactive variables |
| %whos | Show variables with type and summary information |
| %history | Display previously entered commands |
| %time expression | Measure one execution |
| %timeit expression | Measure repeated executions |
| %run filename.py | Run a Python script |
| %matplotlib inline | Display Matplotlib figures inside classic notebook output |
| function_name? | Show short help and signature |
| function_name?? | Show more detail and source when available |
| %reset -f | Delete user-created variables from the kernel; use carefully |
Important distinction: Use %pip for notebook package installation. !pip may call a different pip executable from the one connected to the current kernel. A reliable fallback is !{sys.executable} -m pip install package_name after importing sys.
5.3 Checking Versions and Installation Paths
Inspection commands
# Show the Python interpreter used by the current kernel
import sys
print(“Python interpreter:”, sys.executable)
# Show a package version without depending on package.__version__
from importlib.metadata import version
print(“pandas version:”, version(“pandas”))
# Show the location of the imported package
import pandas as pd
print(“pandas file:”, pd.__file__)
# Show site-package folders
import site
print(“Package folders:”, site.getsitepackages())
The exact paths and version numbers differ between computers. The important check is that the interpreter path, pip installation location and imported package path belong to the same intended environment.
6. File Paths and Saving Files in Jupyter
A path tells Python where a file or folder is located. A relative path begins from the kernel’s current working directory. An absolute path identifies the complete location, such as D:\BPharm_Python\outputs on Windows.
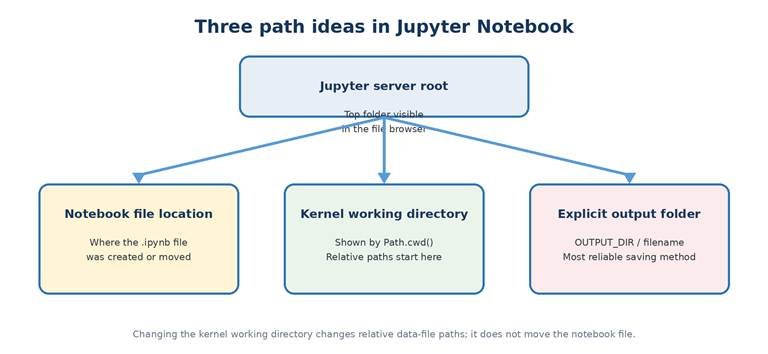
Figure 2. Jupyter server root, notebook location and kernel working directory are related but not identical.
6.1 Check Where Relative Files Will Be Saved
Path check
from pathlib import Path
# The current working directory is the starting point for relative paths.
current_folder = Path.cwd()
print(“Current working directory:”, current_folder)
# Show the absolute path that a relative filename would use.
future_file = (current_folder / “results.csv”).resolve()
print(“results.csv will be saved as:”, future_file)
Sample Windows output (your path will differ)
Current working directory: D:\BPharm_Python
results.csv will be saved as: D:\BPharm_Python\results.csv
6.2 Recommended Project-Folder Structure
Suggested folder arrangement
BPharm_Python/
|– notebooks/ # .ipynb files
|– data/ # input CSV or Excel files
|– outputs/ # result tables
|– charts/ # saved figures
|– requirements.txt # optional package list
`– notes/ # supporting notes
Keeping input data, output tables and charts in separate folders prevents accidental overwriting and makes the project easier to explain, back up and share.
6.3 Create and Use Project Folders Safely
Recommended cross-platform setup
from pathlib import Path
# Create the main folder inside the current user’s Documents folder.
PROJECT_DIR = Path.home() / “Documents” / “BPharm_Python”
DATA_DIR = PROJECT_DIR / “data”
OUTPUT_DIR = PROJECT_DIR / “outputs”
CHART_DIR = PROJECT_DIR / “charts”
# parents=True creates missing parent folders.
# exist_ok=True avoids an error if a folder already exists.
for folder in (PROJECT_DIR, DATA_DIR, OUTPUT_DIR, CHART_DIR):
folder.mkdir(parents=True, exist_ok=True)
print(“Project folder:”, PROJECT_DIR.resolve())
print(“Output folder:”, OUTPUT_DIR.resolve())
Most reliable method: Save every file using an explicit Path object, for example OUTPUT_DIR / ‘summary.csv’. This is safer than depending only on the current working directory.
6.4 Change the Kernel Working Directory
Python method
from pathlib import Path
import os
project_folder = Path.home() / “Documents” / “BPharm_Python”
project_folder.mkdir(parents=True, exist_ok=True)
# Change the working directory for the current kernel session.
os.chdir(project_folder)
print(Path.cwd())
Jupyter magic method
# IPython magic alternative
%cd “D:\BPharm_Python”
%pwd
Windows path rule: Use a raw string such as r’D:\BPharm_Python’ or use forward slashes such as ‘D:/BPharm_Python’. This prevents backslash sequences such as \n from being interpreted as special characters.
6.5 Make a Folder the Jupyter Browser Root
The simplest method is to open Anaconda Prompt, change to the desired folder and then start Jupyter. Notebook 7 uses Jupyter Server; its root_dir setting controls the top folder visible in the Jupyter file browser.
Start Jupyter in the desired root folder
# Windows Anaconda Prompt
cd /d “D:\BPharm_Python”
jupyter notebook
# Direct current Jupyter Server option
jupyter notebook –ServerApp.root_dir=”D:\BPharm_Python”
For a permanent configuration, first run jupyter server –generate-config. Then edit the generated jupyter_server_config.py file and set c.ServerApp.root_dir = r’D:\BPharm_Python’. Make a backup of the configuration file before editing it.
Notebook-file warning: Changing Path.cwd(), os.chdir() or %cd changes where relative data files are read and written. It does not move the open .ipynb notebook. Create or move the notebook through the Jupyter file browser and press Ctrl+S to save it there.
6.6 File-Saving Examples
| File type | Command using an explicit output path |
| Text | (OUTPUT_DIR / ‘note.txt’).write_text(‘Completed’, encoding=’utf-8′) |
| CSV with pandas | df.to_csv(OUTPUT_DIR / ‘summary.csv’, index=False) |
| Excel with pandas | df.to_excel(OUTPUT_DIR / ‘summary.xlsx’, index=False) |
| Matplotlib chart | plt.savefig(CHART_DIR / ‘trend.png’, dpi=200, bbox_inches=’tight’) |
| JSON | json.dump(record, open(OUTPUT_DIR / ‘record.json’, ‘w’)) |
7. Examples
Every example follows the requested learning sequence. Run one example at a time in Jupyter Notebook. Install a third-party package only before the first example that requires it.
Example 1: Calculate the Number of Containers with math
Problem statement: A simulated packing exercise has 125 tablets and each container holds 10 tablets. Find the number of containers required without leaving unpacked tablets.
Objective: Use the standard-library math module and understand why math.ceil rounds upward.
Variables / formula / library: total_tablets = 125, capacity_per_container = 10, containers_required = math.ceil(total_tablets / capacity_per_container).
Algorithm
- Import the math module.
- Store the total tablets and container capacity.
- Divide total tablets by capacity.
- Round the result upward with math.ceil.
- Display the number of containers.
Commented Python program
# math is part of the Python standard library.
import math
total_tablets = 125
capacity_per_container = 10
# ceil() moves 12.5 upward to the next whole number.
containers_required = math.ceil(total_tablets / capacity_per_container)
print(“Containers required:”, containers_required)
Sample output
Containers required: 13
Interpretation: Twelve full containers hold 120 tablets, so one additional container is required for the remaining five tablets. No separate installation was needed.
Example 2: Calculate Mean Tablet Weight with statistics
Problem statement: Five simulated tablet weights are available in milligrams. Calculate their arithmetic mean.
Objective: Use statistics.mean from the standard library for a short list of numerical values.
Variables / formula / library: tablet_weights_mg = [500.2, 499.8, 500.1, 500.0, 499.9]; mean_weight_mg = mean(tablet_weights_mg).
Algorithm
- Import mean from statistics.
- Store the simulated weights in a list.
- Calculate the mean.
- Display the result to two decimal places.
Commented Python program
# statistics is supplied with Python.
from statistics import mean
tablet_weights_mg = [500.2, 499.8, 500.1, 500.0, 499.9]
mean_weight_mg = mean(tablet_weights_mg)
print(f”Mean tablet weight: {mean_weight_mg:.2f} mg”)
Sample output
Mean tablet weight: 500.00 mg
Interpretation: The simulated observations average 500.00 mg. This example demonstrates summary calculation only and does not apply an official acceptance limit.
Example 3: Calculate Days Between Two Dates with datetime
Problem statement: For a classroom record, calculate the number of days between 16 August 2026 and 28 February 2027.
Objective: Use standard-library date objects and subtraction to obtain a time difference.
Variables / formula / library: start_date and end_date are date objects; days_between = (end_date – start_date).days.
Algorithm
- Import date from datetime.
- Create the start and end dates.
- Subtract the start date from the end date.
- Read the days property.
- Display the result.
Commented Python program
from datetime import date
start_date = date(2026, 8, 16)
end_date = date(2027, 2, 28)
days_between = (end_date – start_date).days
print(“Days between dates:”, days_between)
Sample output
Days between dates: 196
Interpretation: The two classroom dates are 196 days apart. The program uses fixed simulated dates and is not an expiry or shelf-life decision system.
Example 4: Generate Reproducible Simulated Readings with random
Problem statement: Generate five simulated percentage readings between 98.5 and 101.5 and make the same values appear whenever the teaching cell is rerun.
Objective: Use random.seed for reproducible classroom simulation.
Variables / formula / library: seed = 42; simulated_readings contains five rounded random.uniform values.
Algorithm
- Import random.
- Set a fixed seed.
- Generate five uniform values in the selected educational range.
- Round each value to two decimals.
- Display the list.
Commented Python program
import random
# The fixed seed makes this classroom example reproducible.
random.seed(42)
simulated_readings = [
round(random.uniform(98.5, 101.5), 2)
for _ in range(5)
]
print(“Simulated readings:”, simulated_readings)
Sample output
Simulated readings: [100.42, 98.58, 99.33, 99.17, 100.71]
Interpretation: The readings are generated for programming practice. A fixed seed is useful when a teacher wants every student to reproduce the same output.
Example 5: Create Project Folders and Save a Text File with pathlib
Problem statement: Create a BPharm_Python project folder with an outputs subfolder and save a short status file there.
Objective: Use pathlib to create folders and build a reliable output path.
Variables / formula / library: project_dir, output_dir and status_file are Path objects.
Algorithm
- Import Path.
- Build the project and output paths.
- Create the folders if they do not exist.
- Write a UTF-8 text file.
- Display the absolute saved path.
Commented Python program
from pathlib import Path
project_dir = Path.home() / “Documents” / “BPharm_Python”
output_dir = project_dir / “outputs”
output_dir.mkdir(parents=True, exist_ok=True)
status_file = output_dir / “status.txt”
status_file.write_text(“Practice completed”, encoding=”utf-8″)
print(“Saved file:”, status_file.resolve())
Sample output
Saved file: C:\Users\Student\Documents\BPharm_Python\outputs\status.txt
(Your user name and operating-system path will differ.)
Interpretation: The file is saved in an explicitly created outputs folder. The same code works across Windows, macOS and Linux because pathlib joins path parts correctly.
Example 6: Check the Active Kernel and a Package Installation
Problem statement: A student installed pandas but still sees ModuleNotFoundError. Check which Python interpreter the kernel uses and whether pandas is visible there.
Objective: Diagnose an environment mismatch before reinstalling packages.
Variables / formula / library: sys.executable shows the kernel interpreter; find_spec(‘pandas’) returns package information or None.
Algorithm
- Import sys and importlib.util.
- Display the active Python executable.
- Search for the pandas import specification.
- Display whether pandas is available.
- Install with %pip only if it is missing.
Commented Python program
import sys
from importlib.util import find_spec
print(“Kernel Python:”, sys.executable)
pandas_spec = find_spec(“pandas”)
print(“pandas available:”, pandas_spec is not None)
# If False, run this in a separate cell:
# %pip install pandas
Sample output
Kernel Python: C:\…\python.exe
pandas available: True
(The interpreter path will differ.)
Interpretation: True means the active kernel can locate pandas. If installation succeeded elsewhere but this result is False, the notebook is probably using a different Python environment.
8. Common Errors and How to Correct Them
| Error or symptom | Likely reason | Correction |
| ModuleNotFoundError | Package is missing from the active kernel environment | Check sys.executable, then use %pip install package_name |
| pip installed it, but import fails | pip and the notebook use different Python interpreters | Use %pip or !{sys.executable} -m pip |
| %conda command fails | Kernel is not a conda environment or conda is unavailable | Use %pip or open Anaconda Prompt |
| Import name not found | Installation name differs from import name | Example: install scikit-learn but import sklearn |
| FileNotFoundError | Folder or file path does not exist | Print Path.cwd(), inspect the path and create required folders |
| PermissionError | The program cannot write to the selected folder | Use a user-owned Documents project folder |
| Invalid Windows path | Backslashes formed escape sequences | Use pathlib, a raw string or forward slashes |
| File saved but cannot be found | A relative path used an unexpected working directory | Print the resolved path or save with OUTPUT_DIR / filename |
| New package still not recognized | Old package state remains in kernel memory | Restart the kernel and import again |
| Dependency conflict | Installed packages require incompatible versions | Read the error, use %pip check and consider a fresh environment |
| Accidentally overwrote a file | Same output filename was reused | Use clear filenames, date/version suffixes or confirm before replacing |
9. Quick Revision Sheet
| Need | Remember |
| Use a built-in capability | Check the Python standard library first |
| Install in Jupyter | Prefer %pip install package_name |
| Anaconda environment | Use %conda when appropriate; avoid needless mixing |
| Check active Python | import sys; print(sys.executable) |
| Check package details | %pip show package_name |
| Check working folder | from pathlib import Path; print(Path.cwd()) |
| Create folders | Path(…).mkdir(parents=True, exist_ok=True) |
| Save reliably | Use OUTPUT_DIR / ‘filename.ext’ |
| Move the notebook | Use the Jupyter file browser; changing cwd does not move it |
| After installation | Restart the kernel if import still fails |
Mini Glossary
| Term | Meaning |
| Alias | A short import name, such as pd for pandas |
| Environment | An isolated Python installation and its packages |
| Kernel | The process that executes notebook code |
| Magic command | An IPython command beginning with % or %% |
| PyPI | The Python Package Index used by pip to find distributions |
| Dependency | A package required by another package |
| Working directory | The starting folder for relative file paths |
| Absolute path | A complete path from a drive or filesystem root |
| Relative path | A path interpreted from the working directory |
| Jupyter root | The top directory exposed by the Jupyter server file browser |
12. Official Websites and Documentation
The commands and definitions in this chapter were checked against the following official documentation on 16 August 2026. Use official documentation when a command changes or a new software version is released.
- Python Standard Library: https://docs.python.org/3/library/
- pip documentation: https://pip.pypa.io/en/stable/
- Python Packaging User Guide: https://packaging.python.org/
- Python Package Index (PyPI): https://pypi.org/
- IPython magic commands: https://ipython.readthedocs.io/en/stable/interactive/magics.html
- Jupyter Notebook: https://jupyter-notebook.readthedocs.io/en/stable/
- Jupyter Server configuration: https://jupyter-server.readthedocs.io/en/latest/other/full-config.html
- conda documentation: https://docs.conda.io/projects/conda/en/stable/
- NumPy: https://numpy.org/doc/stable/
- pandas: https://pandas.pydata.org/docs/
- Matplotlib: https://matplotlib.org/stable/
- Seaborn: https://seaborn.pydata.org/
- SciPy: https://docs.scipy.org/doc/scipy/
- statsmodels: https://www.statsmodels.org/stable/
- scikit-learn: https://scikit-learn.org/stable/
- openpyxl: https://openpyxl.readthedocs.io/
Next learning step: After mastering packages and paths, continue with basic string operations, conditional statements and loops. Reuse the same project folders and environment.
Dr. Arpana Chaturvedi
Founder, Exceldemy
🎥 YouTube: @arpanachaturvedi9324
🌐 Website: arpanachaturvedi.com
📸 Instagram: @arpanaar
📘 Facebook: Exceldemy